Dallas Nagata White, Ed White, Ron Brinkmann, Todd Sisson, Varina Patel, and Scott Kublin join me and talk about their personal photo projects. We share photos and stories behind them and have just a dandy old time. Ron reveals his cool new app FreezePaint!
I’ve noticed that Japanese and Chinese people often over-use the word “famous” in relation to things. I’ve heard countless times: “See that? It is a very famous rock.” Or, we might pass by a cafe and someone would say, “This is a very famous cafe.” I hear it sometimes a dozen times per day. All these famous things, and I haven’t heard of any of them! So, this leads me to believe that their “famous” is equivalent to our combination of words: “Considerably well-known to a small group of locals.”
Daily Photo -The Wild Japanese River
Here is another photo from Japan (two days in a row) – this time from a more crazy scene!
I hired a boat to take me down a rough river near Nikko. There were many sights to be seen that I could get to from the river, so I decided to take all my equipment on this ride. That was a bad idea! It wasn’t my first (or last) bad idea.
Things got a little crazy in the boat sometimes, and the guys that were “steering” us down the rapids often looked pretty nervous and panicked. When they got panicked, I got 2x panicked!
Okay now that I let it out there with a smaller beta crowd, we can make it official! The HDR Tutorial has been totally re-made and we’ve worked out all the bugs. Also, I made a new video to accompany it that shows how I at least start the process. Enjoy!
Daily Photo – Snow in Nikko
It was a freezing cold morning when I woke up to explore this temple area of Nikko. Luckily, I was the first person to arrive, and I was pretty much alone for this early morning because of the snow. It gave me a peaceful period to explore with my music on… taking my time and moving around the temple to take in the big picture and all the nice little details.
Roughly 18 months ago I partnered with the amazing team at Macphun to develop an entirely new HDR software tool called Aurora HDR. I worked closely with them to include all of the features I felt was missing from Photomatix, Lightroom and other tools in my quiver. Since it’s release over 1.5million people have downloaded it. I’m blown away! Thank you for believing in us!
Aurora HDR 2018 is now available for both Mac AND Windows! Make the switch now.
Daily Photo – The Lake at Nikko
This place was Cold with a capital C, as you can plainly see.
And worse, I had forgotten my special little gloves with the flip-up fingertips.
So I was goin’ finger-commando while trying to line up this shot. The wind was pretty stiff in my face. The wind always seems to be against you, eh? I think I just never notice it when it comes from any other angle.
By the way, there is only one place that is convenient to quickly warm up your fingers.
There is an older, historic part of Nikko that is about a 30 minute drive away. The drive is practically straight up a mountain, through a series of switchbacks. During the entire time up the mountain, I was surrounded by clouds. I thought it would be quite miserable at the top. But once I poked out, everything was free and clear. I was between cloud layers, exactly where this chilly lake sat at sunset.
Teaching Programming to my 9-year-old – any ideas?
Some of you know that my background is Computer Science I got started programming when I was Ethan’s age with my Timex Sinclair 99. I made some awesome games for that thing back in the day… good times…
So, my question… what is the best language / tool / platform to teach a 9-year-old programming? I’m thinking about either using the Android wysiwyg tool, Python, or even a good old-fashioned BASIC emulator.
Daily Photo – The Silent Bridge
When I woke up in Nikko, snow had been falling all night. I started a long walk from the old lodge where I was staying towards the older area that has all the temples. Along the way, I passed by this old bridge with it’s ancient and lavish design. Underneath it, the crystal-clear water flowed quickly as the snowmelt was giving it a bit more action than usual. It was very peaceful and nice.
Some interesting news is coming soon! Are you signed up to our newsletter for free?
We send out about one newsletter a month or so… it varies depending on my mood and travel schedule. The last one contained a bunch of unpublished photos from China (I believe it was issue #17)… and you still have access to it if you sign up now. Be sure to check it out!
Daily Photo – Red Gate After Rain
When I’m someplace interesting, I usually set the alarm to get up quite early. Painful, yes. And then, when I’m in that half-wake state, I stumble to the window to look at the clouds and weather. If it’s a mess, I don’t go, and joyfully crawl back into bed. That’s just about the best feeling in the world.
But, sometimes, I force myself to go out anyway… that is what happened on this day. It was one of those frustrating mornings when it was raining — which makes carrying an umbrella + tripod + two cameras + camera bag quite a drain! But after walking a few kilometeres, I found this giant red gate that led to a quiet temple complex. I set up for a few shots before venturing into the beyond.
I am going to be asking for some more HDR Spotting editors. The flow of photos is picking up and I think the current team is getting overloaded! Anyone can apply — please head on over to the site and put in your application!
New Nikon 18-200 Review
The photo below has been added to the Nikon 18-200 Review. It helps to show the full range of the zoom. My reviews are usually short and sweet, showing the practical use of the camera or lens.
If you want to see more Reviews, just follow that link!
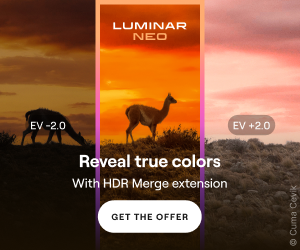
Daily Photo – The Icy Part of the Waterfall
This waterfall was enormous! I’ve never been to Angel Falls in South America, although that is on my list. I know that these places are extremely difficult to photograph. Luckily, for this one, I had a good vantage point at the bottom that let me zoom in.
I took this photo in the very early spring, during cherry blossom season in Japan. There is still snow and ice in the highlands, and you can see a small pack of it here behind the waterfall. I also have a “zoomed out” version of this on the review page mentioned above.
I continually get good questions like, “How do you take photos without people in them???” And then, even better, many people in the community respond for me, telling others how I do it! That’s great… I really enjoy when you guys talk to one another, post links to show examples, and all this sort of thing.
Are you the silent reader type? Don’t be! We want to hear your thoughts and questions!
Anyway, to answer this perennial one, there are many ways. But, in this case, I took the HDR in Aperture priority mode at ISO 50 and f/22. By forcing these two, it made the shutter speed extra-long. When the shutter is open a long time, people that are walking by do not even cast enough light to make any long-term difference on the sensor. Does this make sense? Maybe experiment a little and you will see what I mean.
Daily Photo – Old Forest After the Snowmelt
On another one of those painful mornings, I woke up early to explore all around Nikko. Some snow had fallen during the night, and a warm morning sun helped to melt everything into reflective wet surface. It also helped the leaves and bark to glow in an inviting way. There are many beautiful old areas of Nikko that are separated by these long pathways through the forest. It’s right out of a Final Fantasy game, and I could not help but stop every few hundred feet for another photo!
Have you seen my SmugMug Review? I have something new to report about China – It works here! I’m still here in China, making daily updates to the blog.
Flickr is blocked here, so if I still linked my photos there, the blog would look rather boring. Now, when I meet with people here, I can easily show them everything, and it essentially opens up the blog to several hundred million more people. That’s great… and not something I really thought about before switching my main party affiliation to SmugMug.
Daily Photo – The Nikko Waterfall from Afar
I’ve been pretty lame, frankly, in finishing up my Nikon 18-200 Review. But, this is a photo that I took with that lens when I was in Japan. I wanted to show the vast range of the lens, and this is the “zoomed out” view. In coming weeks, I’ll post the “zoomed in” view, so you can see the tremendous range. Yes, it’s a cropped lens so I can’t use my full-frame, but it’s not really the end of the world. It’s light, cheap, and very flexible… these are some nice plusses!
I had never gotten to a waterfall in such a unique way! I started at the top of this thing and took an elevator DOWN, hundreds of feet. I then went through about a quarter-mile of caves to emerge at the bottom, where I got this perspective. It was really unique and messed with my whole sense of location. I’m so used to taking the elevator “up” to get somewhere interesting. I had to put on my earphones to listen to some unique music to get my bearings back before shooting this photo.
I’ve been talking about this for a long time, so I wanted to go ahead and give you some free tips for on-the-street people photography.
From various conversations, I think that photographers are REALLY interested in taking photos of people they see on the street. We can’t help it, right? Our eyes are drawn to interesting “things” — not just landscapes. And if we see an interesting person, we really want to take their photo, yes? But then, often times, we don’t even pull the camera up to our eye because we are shy, embarrassed, or think about all the horrible things that could go wrong. So, maybe these tips will help!
Look, honestly, I don’t know if these will do you any good or not. But these are some things that I personally think about. So, insofar as some of my insights are useful to me, maybe they will be useful to you too!
Even though I’m known for “landscape photography”, I actually enjoy all kinds of photography! I take hundreds of people photos, object photos, food photos, model photos, B&W photos, etc. I assume that you take many types of photography too.
1) If you prefer to take photos of people as they are acting naturally, go ahead and take the photo before they notice you. You are a photographer, and this is you. You capture life… if you see something interesting whether it is a landscape, a pile of peaches, or a person that strikes your fancy, go ahead and do it. If you like and it is convenient, you can always go show them the photo after you are done. I do this whenever it makes sense, and I have a nice little interchange with the person.
2) Keep an extra camera ready for people shots. When walking the streets, I normally have my “big” camera ready to go for city landscape shots. My tripod is on. My wide-angle is on. It’s in that “mode.” If I am going to have to switch lenses, it will take forever, and the moment will be lost. So, I carry a second camera on a sling around my shoulder for people shots. On that camera, I have an 85mm or 50mm prime lens. Now, you don’t have to have this exact setup by any means, but having ANY kind of second camera for people shots is recommended.
2b) I find that the 85mm prime keeps me outside something I call the radius of intimacy. That is, when you use a 50mm, you are so close that people often stop acting naturally, unless they are a professional model or a natural thespian.
3) If they ARE likely to notice you, be confident and deliberate, softly asking permission with your eyes. This is a very subtle and hard thing to explain. I usually raise my eyebrows while I raise my camera, clearly indicating, “I’m about to take a photo. Everything is okay.” If they don’t want you to, they will make it clear. Usually, they say it’s just fine. People like to be thought of as interesting.
4) If they are very close, I ask permission out loud. Often times, I don’t want them to pose… so I say something (smiling!) like, “You look very interesting — can I take a photo?” Once they say yes (98% of the time they do), I usually ask them not to pose and carry on about their business. Then I start taking a bunch of photos and enjoy the pressure of capturing the moment.
5) Don’t be shy! If you feel overly shy, it may be a larger indication that you are letting fear motivate you rather than the opportunities that life provides. So, if you feel doubt or fear, just try to channel me and be brave and forthright.
Regarding that last one, seriously, folks, just be cool and confident with it. If you want to do it, and it feels right, just do it. Do not worry so much about rejection. Yes, you WILL get rejected 2-10% of the time depending upon how likable you are. Out of 500 people photos, I’ve been rejected maybe 10-13 times. It doesn’t bother me a bit. So what? People say no… big deal. The fact is that MOST people LOVE to have photos taken of them. To be interesting in a world of same-ness is a tremendous thing. Chances are that no one has ever taken a photo of them before, and they will feel special that you thought they were special.
Most of the time, after I take a photo and people look over at me, wondering, “Why did you just take a photo of me?” I usually say, “You look cool!” Or, “You look awesome!” Or, if they don’t speak English, I give them a thumbs up and a facial indication that I think they look cool. 99% of the time, they smile and carry on.
If you’re taking a photo of a kid, just get a steady nod from the parents before. Bend down to take the photo, look up at the parent, saying, “is it okay?” with your eyes. They’ll say yes or no… There is a significant number of moms out there that watch too much sensational news and assume that 50% of the population are pedophiles… but, maybe you’ll hit that other 50%! Again, we’re all just photographers, and if we see a cute or interesting kid, of course we want to take a photo! It’s what we do! There is no need to apologize for it! 🙂
Daily Photo – Salaryman in Tokyo
While I was in the middle of making a time-lapse sequence (see the video below the photo), I was using my D3S on a sling to take quick photos of interesting people. They were everywhere!
Behind me, waiting for the light to change, was this young salaryman. Salaryman is the Japanese word for “businessman”. That word salaryman always cracks me up for some reason. Anyway, he was this young kid, standing there in a most unassuming way in this nice suit. I spun around and grabbed a quick shot.
He looked a little confused at me after I took it. I gave him a nod of thanks, and he smiled in a surprised way then went merrily on his way.
Videos – Life in Japan
While I am busy shooting landscapes and people in Japan, I also take time to make some videos. Below are a few of them from recent past. The music from both is by the great Patrick O’Hearn (buy his stuff!). Enjoy!
New eBook – First goes on sale to Newsletter Subscribers!
For the past few months, I’ve been working on a new eBook. It’s very cool — a very detailed description of a best-of-breed digital workflow. Are you starting to feel like your digital photos are a little unorganized? I’ve put together a great system for you!
The first shot at it will go to Newsletter subscribers. It’s free to sign up, so just do it below!
5 Tips for Photographing People in Public
I’m working on an upcoming post that gives some practical and easy-to-follow-through-on advice on taking photos of people in public. I get a ton of questions about it in Twitter and whatnot, so I am happy to share these tips. You’ll notice a lot of this activity in the new video below…. and I know everyone enjoys and wants to take pictures of people in public, but are sometimes unsure of how to go about it.
New Video – Japan: Heartbeats of Time
I spend a lot of time thinking about the way memory and sight work together. I don’t think we remember in “pictures” or long videos… but something in between. Perhaps we also sense, at times, more than 30 fps, and unexpected parts of the brain fire when we are presented with certain objects and forms.
If you want to know more about how I did this, visit the “Stuck In Motion” section of the website. Good news – the best bits now only require a $200 camera!
Also, you may enjoy seeing my free HDR Tutorial, which describes how I accomplish some of the other favorite photos below, which were also shot around Japan.